This is the build summary so far:
1. Project overview and basic neck materials: Fiberglass, two-part epoxy and basswood
2. Making a heat box for curing the epoxy
3. Assembling and curing the laminate
4. How not to cut the laminate, part one and part two
5. And God created the band saw
6. A whole bunch of parts arrive
7. A guitar-like shape occurs
8. Flattening the laminate
9. Cutting the truss rod channel
2010-10-12

Cutting a Truss Rod Slot
It's time to cut the truss rod slot, because the back of the neck is still flat and the face of the neck is just about ready for the fingerboard. Next I think I have to thickness the back of the "thin part" of the neck down to 3/4", but leave the headstock material there, and once I do that, things will get rough in Flatworld. Once I do this, I'll never be able to lay the neck flat again easily:


I got the correct 7/32" router bit at Ring's End. I checked the aluminum for straightness. I took into account that my router base has a radius of slightly less than 3" (2 63/64" or so). I measured with a metal ruler that goes down to 64ths. As my grandfather never would have said, "measure 2,028,887 times, cut 2300 times." I tried to always keep the router pinned to the guide, but without pushing hard enough to risk moving the guide itself. I cut in small increments, about five passes. And still I screwed it up!


The next operation after that will involve gluing on the fingerboard, profiling the back of the neck (into an approximate "C" shape) or both, and the neck will start getting lumpy, bumpy, rounded and so forth.
I had trouble routing this laminate before (see here), but I think that was because I took too much at a time. I've successfully routed into and through epoxy layers in my thicknessing operations, leading me to believe that if I go slow I won't start any fires. So I made a setup to guide the router:

I got the correct 7/32" router bit at Ring's End. I checked the aluminum for straightness. I took into account that my router base has a radius of slightly less than 3" (2 63/64" or so). I measured with a metal ruler that goes down to 64ths. As my grandfather never would have said, "measure 2,028,887 times, cut 2300 times." I tried to always keep the router pinned to the guide, but without pushing hard enough to risk moving the guide itself. I cut in small increments, about five passes. And still I screwed it up!
Excellent.

That's the truss rod, laying next to its future home. I created two problems, both recoverable:
- The slot is about 1/64th to the right of where it should be. This is due to me being a poor craftsman and a bad judge of distances. But I've haven't filed the neck to its final width, and I have that much room over on the right if I want it.
- I goofed up twice and the bit cut toward me in two spots. Not too terrible; I think it's visible in the image. I'm going to hide that under the fingerboard. This happened because I was trying to push back hard, but not too hard, while moving the router left, but not too quickly, while also thinking about how horrible it would be if I screwed up.
Whew.
2010-10-09
Using the Custom Board Flattening Router Jig...Thingy
Well! All I can say is, don't do this. Not at home, even. Certainly don't post it on the internet, because sure as the sun comes up, somebody is going to laugh at you. FYI, I had to take the two center braces off again (drilling out rivets and making new holes) to space the center part wide enough to fit the headstock. I am extremely tired of aluminum and pop rivets.

This silly little plastic-coated MDF folding table is the single best (usable by me) oasis of flatness in my house! You should have seen me with the carpenter's square, measuring the basement floor and every beaten-up old desk (there are two). This thing was a miracle where I least expected it. But it's not perfect, and certainly the board I'm working on isn't either, so when I clamped the headstock end, I had to weight down the middle to press the other end to the surface. The dumbbell weights are balanced across the neck on a piece of mild steel left over from a previous laughable project. This configuration gets me additional clearance for my router grips as I work from the side.


I got into the periphery of the epoxy zone at the boundary of this slice of 1/16" basswood - you can see the blue. I've got a couple of choices here:

This silly little plastic-coated MDF folding table is the single best (usable by me) oasis of flatness in my house! You should have seen me with the carpenter's square, measuring the basement floor and every beaten-up old desk (there are two). This thing was a miracle where I least expected it. But it's not perfect, and certainly the board I'm working on isn't either, so when I clamped the headstock end, I had to weight down the middle to press the other end to the surface. The dumbbell weights are balanced across the neck on a piece of mild steel left over from a previous laughable project. This configuration gets me additional clearance for my router grips as I work from the side.

Then I put the weights on the end and did the middle. I came up with some reasonable flatness. It's still bowed down in the middle a little, and I have theories as to why, but I don't really care. I'm calling it good because it's even and reasonably consistent. I can adjust it with the truss rod, or externally, when it's time to level the frets. I will probably apply some 220-grit paper to my 1/4" glass and clean it up ever so slightly, then I'll call it good.

- Epoxy on another fiberglass/basswood layer and give myself some wood to glue onto (with the obligatory flattening step, which may not work because that much wood might well make the piece too thick to fit under my flattening jig)
- Glue the fingerboard on with epoxy. Sounds good to me. If I find myself with a guitar neck that's so screwed up that I am facing the prospect of taking the fretboard back off, I'm pretty much going to be starting again probably.
This was a very tense operation for me. One serious mistake and I'd have been facing a total do-over, which isn't as bad as it sounds: I think I could get back to this point within a week if I had to, knowing what I know now (and having what I have now). But I really, really didn't care to find out. Now I've got to be doubly careful of those nice sharp corners. The neck piece is acquiring delicacy along with its flatness. Very strange.
2010-10-07
Custom Board Flattening Router Jig
I had an idea. I made a jig for my router that sits over the board and may or may not flatten the face of the neck.


I got some angle aluminum and 3/16" pop rivets and a pop rivet gun. I looked at the angle steel but it was not even remotely straight, and I have no good way of cutting it. I cut the aluminum with a hacksaw, as most of the lengths were longer than the 12" my band saw can accommodate. I made the bracket you see, minus the two inner struts parallel to the guitar neck. A bracket that wide would be versatile - that was my reasoning. It would be good for all kinds of flattening jobs.
It made a clean test cut, but the router dipped in the middle and the face of the test board was concave or cupped. So I added those two inner braces, 3" apart, to keep the sag down. Along the way, I put rivets in the wrong places, facing the wrong way, drilled them out poorly, you name it. In addition I somehow inserted the tip of a brand new hobby knife (#11) into the meat at the heel of my thumb, and my unused 3/16" drill bit got dull already.
Good times.
This is what the router would see, if a router had eyes and a nervous system:

I'm going to have to pick up a piece of 1"x3" or similar, find a truly flat place to stage this (maybe my dad's table saw table), and flatten at least a one-foot length. Only then will I feel reasonably safe in trying to flatten my guitar neck.
2010-10-04
How (Not) to Flatten a Piece of Wood
I want to glue the fretboard to the neck, but I want the neck to be very flat and true first. The fact is, however, this board is not flat. The fiberglass/epoxy layers are probably more compressed in some places than others, the basswood probably wasn't exactly 1/16" thick everywhere - this is how it goes.
Near the start of this in a post entitled "Disaster...Or Victory?", you can see that I set up my laminate on a sheet of 1/4" plate glass. This very typical and common type of glass is sometimes called float glass for its habit of being created on a pond of molten tin. Molten tin! So it's generally considered pretty flat. The idea was, lay the laminate up on a perfectly flat sheet, weight it down against that sheet, and you get a board with at least one perfectly flat face!
Well that didn't work out so good. Somehow it didn't happen, some entity or phenomenon got between my float glass and my laminate, and it just didn't work out that way. So I have to flatten this board. I'm naive so I figured I could just rub the board against some sandpaper affixed to that very same piece of glass, and make it flat. But only the actual neck part - the headstock is going to get rebated away anyhow. First mistake: I should have taken the headstock down first by sawing, to get it out of the way.

For a while I had the glass on a carpet and pushed down on the board, as I rubbed it around in circles. I drew in pencil on the board to see where I was taking off material - where the high spots were. After about 40 minutes at 120 grit, I did get to a point where the sandpaper had cleaned up the whole board, but all was not perfect. There was still a low spot in the middle of the neck! I hypothesize that by pushing down on the piece, I flexed it into contact with the glass, thus taking more off the part directly under my hand. In some strange way, the high parts escaped. Perhaps, also, the glass was flexing into the carpet. One thing I did right: I constantly swept the sandpaper and the board clean to prevent little piles of dust from glomming onto the paper, forcing the wood up over it. Here's the board with pencil writing on it:

But it was much better than before, clearly. I was still hopeful. Time to adjust my attack. This time I placed the glass on a long level and gave it some new sandpaper, still 120 grit. And - here's my innovation - I didn't press down on the board, I just pushed it gently from either end, back and forth. And I checked it with a straight edge regularly. And lo! it got even better. But all was still not perfect, in fact I had a totally new problem:

I don't know if you can see it here, but the left side is thicker than the right. The top may be flat, but the whole thing is canted over. My cheap but cool digital micrometer is AWOL due to a battery condition right now, so I can't tell you exactly how much. 1/3 of a millimeter? Something like that. Is this a problem? Well, two things:
Near the start of this in a post entitled "Disaster...Or Victory?", you can see that I set up my laminate on a sheet of 1/4" plate glass. This very typical and common type of glass is sometimes called float glass for its habit of being created on a pond of molten tin. Molten tin! So it's generally considered pretty flat. The idea was, lay the laminate up on a perfectly flat sheet, weight it down against that sheet, and you get a board with at least one perfectly flat face!
Well that didn't work out so good. Somehow it didn't happen, some entity or phenomenon got between my float glass and my laminate, and it just didn't work out that way. So I have to flatten this board. I'm naive so I figured I could just rub the board against some sandpaper affixed to that very same piece of glass, and make it flat. But only the actual neck part - the headstock is going to get rebated away anyhow. First mistake: I should have taken the headstock down first by sawing, to get it out of the way.

For a while I had the glass on a carpet and pushed down on the board, as I rubbed it around in circles. I drew in pencil on the board to see where I was taking off material - where the high spots were. After about 40 minutes at 120 grit, I did get to a point where the sandpaper had cleaned up the whole board, but all was not perfect. There was still a low spot in the middle of the neck! I hypothesize that by pushing down on the piece, I flexed it into contact with the glass, thus taking more off the part directly under my hand. In some strange way, the high parts escaped. Perhaps, also, the glass was flexing into the carpet. One thing I did right: I constantly swept the sandpaper and the board clean to prevent little piles of dust from glomming onto the paper, forcing the wood up over it. Here's the board with pencil writing on it:

But it was much better than before, clearly. I was still hopeful. Time to adjust my attack. This time I placed the glass on a long level and gave it some new sandpaper, still 120 grit. And - here's my innovation - I didn't press down on the board, I just pushed it gently from either end, back and forth. And I checked it with a straight edge regularly. And lo! it got even better. But all was still not perfect, in fact I had a totally new problem:

I don't know if you can see it here, but the left side is thicker than the right. The top may be flat, but the whole thing is canted over. My cheap but cool digital micrometer is AWOL due to a battery condition right now, so I can't tell you exactly how much. 1/3 of a millimeter? Something like that. Is this a problem? Well, two things:
- The damn thing's still not straight enough. I want it about as perfect as possible, because if the fretboard goes on flat then in theory I will have to spend less time leveling the frets.
- I don't want it tilted over. That irritates me. I'm building a simple guitar, not some fancy ergonomic thing.
I still have enough wood to stop and figure out what to do. Fender neck blanks are sold 13/16" thick, and this one is about 15/16". The only trick is I don't want to stop on an epoxy/glass layer, or partway through one, as that'll force me to change my choice of glue from Titebond to epoxy. Big deal? Dunno. And I'm not sure many machines will be happy cutting through a nasty layer of garbage like that.
In any case, I'm reaching out for help here while I've still got room to move. I'll post more when I get the guidance I need. You'd be surprised how hard it is to find answers to this on the internet. You're either supposed to use a giant plane with ninja woodworking technique, or you're supposed to have an electric thickness planer. Even to use the planer, I'd have to prop up the other side of the board (which is even worse than this one) artfully in a facsimile of a flat surface to give the planer something to push against. I suspect I'm going to end up with a belt sander and a sanding frame, or some homemade router rig set up on a table saw table.
I have discovered this: the concept of flatness is a human one. It is a state known only to water on the calmest of days. It's a strange place to be, knowing exactly what I think I want in a very geometric way, and being unable to arrive at that configuration.
I am a monkey.
2010-10-02
First True Cuts, Or, Something Reminds Me of a Guitar
With all the ingredients in place I decided to put a blade on the band saw and make my first meaningful cuts - all the previous cuts were to clean up the laminate, or test a theory.
I put the Lenox Neo-Type blade on the bandsaw, because it's 3/8" wide vs. the Zona's 1/4", and I have a theory that it would be more boxed in by the blade guides for these critical cuts. At first I thought it was too big, but it tightened in nicely. I used the blade tension indicator on the saw and left it right at the marker for 3/8" blades. Though I wouldn't trust that indicator with my life, it seemed to work pretty good today. I put the guides in pretty tight and set the bearings close behind the blade - they spun continuously while I was cutting, but hardly at all when I wasn't. I trued the table with a square and made a test cut.
Nice test cut, nearly perfect 90 degrees. Ooh la la.
I marked up the board based on the measurements from Warmoth and some double-checking I did with the LSR nut and the neck on my G&L S-500, which is different in length but not in scale or width.

Then I fired it up. I left the pencil lines, because there's no way in hell I'm getting away without sanding to the final width (after I profile the back of the neck, leaving much less to sand). With a circular saw you might slice right to your target, but me with a band saw? Not so much. I fed slow and carefully. There's an interesting hysteresis in making these cuts, because band saws cut at an angle to the theoretical line of the blade. When I turn too fast away from my current path, it takes time to get started on the turn, and then it overshoots, and then it takes more time to get back then I think it ought. And overshoots again, if I'm not thinking ahead. I think that's because the blade has a finite width (in this case 3/8") and takes time to go around corners. Splitting the distance and putting my line in the "natural" path of the blade must be a skill that I don't know yet.
I did alright. Good enough, I believe.

That old saw (odam!) about "just get rid of anything that doesn't look like a guitar" comes to mind. I am really happy with these cuts. These cuts don't suck. I was also worried about air voids in the laminate layers, but looking around the edge of the piece I don't see any such. It's a clean, tight wood/epoxy/glass sandwich.

Next up: I'm not sure. I have to think about it. Maybe cutting the truss rod slot while it still has a flat back. Maybe first beveling off the back perhaps 15 degrees (in effect, starting the shaping/profiling process early) in order to remove some wood, then get these edges straight and true and relatively final, while leaving plenty of flat on the back to easily cut the truss rod slot.
Also, this thing seems very strong. On the one hand, I have no idea how much an unprofiled maple neck of similar dimensions bends when you stand on it in the middle with the ends up on blocks, but this one doesn't seem to deflect much at all. I was somewhat surprised. Is that a good thing? Who knows?
It doesn't matter right now. Today was good, and I'm going to leave it that way.
I put the Lenox Neo-Type blade on the bandsaw, because it's 3/8" wide vs. the Zona's 1/4", and I have a theory that it would be more boxed in by the blade guides for these critical cuts. At first I thought it was too big, but it tightened in nicely. I used the blade tension indicator on the saw and left it right at the marker for 3/8" blades. Though I wouldn't trust that indicator with my life, it seemed to work pretty good today. I put the guides in pretty tight and set the bearings close behind the blade - they spun continuously while I was cutting, but hardly at all when I wasn't. I trued the table with a square and made a test cut.
Nice test cut, nearly perfect 90 degrees. Ooh la la.
I marked up the board based on the measurements from Warmoth and some double-checking I did with the LSR nut and the neck on my G&L S-500, which is different in length but not in scale or width.

Then I fired it up. I left the pencil lines, because there's no way in hell I'm getting away without sanding to the final width (after I profile the back of the neck, leaving much less to sand). With a circular saw you might slice right to your target, but me with a band saw? Not so much. I fed slow and carefully. There's an interesting hysteresis in making these cuts, because band saws cut at an angle to the theoretical line of the blade. When I turn too fast away from my current path, it takes time to get started on the turn, and then it overshoots, and then it takes more time to get back then I think it ought. And overshoots again, if I'm not thinking ahead. I think that's because the blade has a finite width (in this case 3/8") and takes time to go around corners. Splitting the distance and putting my line in the "natural" path of the blade must be a skill that I don't know yet.
I did alright. Good enough, I believe.

That old saw (odam!) about "just get rid of anything that doesn't look like a guitar" comes to mind. I am really happy with these cuts. These cuts don't suck. I was also worried about air voids in the laminate layers, but looking around the edge of the piece I don't see any such. It's a clean, tight wood/epoxy/glass sandwich.

Next up: I'm not sure. I have to think about it. Maybe cutting the truss rod slot while it still has a flat back. Maybe first beveling off the back perhaps 15 degrees (in effect, starting the shaping/profiling process early) in order to remove some wood, then get these edges straight and true and relatively final, while leaving plenty of flat on the back to easily cut the truss rod slot.
Also, this thing seems very strong. On the one hand, I have no idea how much an unprofiled maple neck of similar dimensions bends when you stand on it in the middle with the ends up on blocks, but this one doesn't seem to deflect much at all. I was somewhat surprised. Is that a good thing? Who knows?
It doesn't matter right now. Today was good, and I'm going to leave it that way.
Fender Neck Dimensions from Warmoth
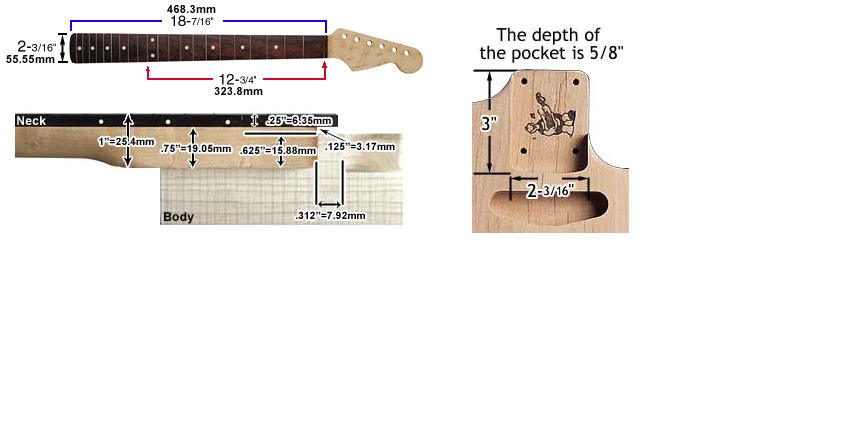
Finally, after weeks of fruitless googling, I found the magic place to get overall neck dimensions. This page is genius, absolute genius:
http://www.warmoth.com/Guitar/Necks/faq2.aspx
I now know how wide the heel should be, how long from nut to heel, thickness at heel, depth of neck pocket. I'm very grateful to Warmoth for having this out there. Without this, I'd have had to go to the music store with a ruler and still not bought anything; or I might have made up my own neck format. This way, if the neck ever breaks and I'm too tired to make another, I can get an affordable, premade replacement.
I hope Warmoth don't mind that I made up a cheat sheet for myself from their images:

http://www.warmoth.com/Guitar/Necks/faq2.aspx
I now know how wide the heel should be, how long from nut to heel, thickness at heel, depth of neck pocket. I'm very grateful to Warmoth for having this out there. Without this, I'd have had to go to the music store with a ruler and still not bought anything; or I might have made up my own neck format. This way, if the neck ever breaks and I'm too tired to make another, I can get an affordable, premade replacement.
I hope Warmoth don't mind that I made up a cheat sheet for myself from their images:
Subscribe to:
Posts (Atom)