2010-04-17

Wow, This Stuff Is Hard to Cut Part One

I wrapped up my future guitar neck in a heavy-duty plastic bag and threw a couple of dust masks into the car.  On the way to my dad's house I stopped by a big box home improvement store to buy a saw blade with as many teeth as I could find.  I didn't know what size saw he's got; most of the table/miter saw blades at this place were 10" or 12".  I can either buy one and return it immediately for the correct item (my usual pattern) or do the right thing...so I called him up from inside the maw of the beast.  Is it pathetic of me to say that sometimes, still, mobile phones strike me as new, strange and marvelous?

Why, yes.  Yes it is.

He told me the blade on his saw is an 8.25", and that's the biggest that will fit.  I was walking up and down the aisle, not seeing any such size:  the table saw blades being too big, and the circular saw blades being too small.  I finally settled on an inexpensive 7.25" plywood blade meant for a circular saw, advertised as working on OSB and plastic as well.  Lots of teeth - check.  Cheap - check.  There's a really cool one that looks like it could cut through a bass boat, but it's over $40 and I'm on a budget here.

My dad's table saw is a piece of junk.  Now please understand that this is a guy who literally makes his own wooden replacement garage doors, with the inset panels and all that, and he rebuilds windows too.  He doesn't have a problem with this saw - I do.  It's got a 1/2" arbor and everything else in the world is 5/8", so he hand-centers the blade under the washer.  No, really.  Really.  The rip fence needs to be shimmed with wood slivers for the lock-down lever to work, and it doesn't quite go parallel unless you measure it and tap it into position.  The guy grew up helping my grandfather build houses, and I think that back in the day they had to cut wood with their fingernails - that must be it, because I don't think it's possible to cut a straight line with this saw.

That's what makes my father's table saw perfect for this job.  If we live through it.


We masked up and I put some work gloves on.  We adjusted the rip fence to approximately okay and I fed the piece in slow.  The board has two fuzzy sides and no frame of reference, so I quickly got off track and started digging into the wood.  I gave myself more room and just took the plastic off.  This is probably what wrecked the blade.  It stalled out completely and began to burn the plastic when I tried to cut one end off:


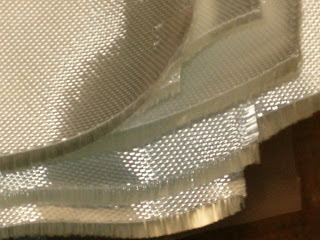
You can probably see how that cut is a little toasty.  By this point the teeth on the blade were actually rounded off.  You could throw it at a bowl of jello and it would bounce off.  As a bonus, the air was indeed filled with scintillating death, a glass fiber death cloud that could have shut down air traffic downwind for 200 miles (current events reference!).

So what now?  I'm 25% done turning this into a presentable piece of wood, and the future looks like an endless serious of broken table saw blades, burnt wood, melted epoxy, and a small Superfund cleanup.  I'm thinking three things:
  • Band saw!  Someone else's band saw!
  • Don't cut the plastic next time
  • How on earth will I shape the neck, if simply cutting it is this difficult?
Total cost:  $9 for a useless metal disc

2010-04-04

Disaster...or Victory?

I was going to put a piece of 4.25" x 36" x 0.25" plate glass on the short side of a level and do the layup on that.  It's actually basically what I did.  You can see one of the plastic layers I used to prevent the glass from becoming a permanent part of the guitar; before I started, there were two for complete coverage.

I mixed 8oz of epoxy at a time in one of the 9oz measuring cups, 6 of the main ingredient to 2 of the hardener.  To this I added a couple of drops of the blue dye.  Each 8oz batch of epoxy got me about 4 sheets of wood/cloth.

I put down the epoxy on the bare wood sheet, then put down the fiberglass, then more epoxy. I attempted to press any air gaps out each time I added a sheet of wood, using my hands as a roller.  Keeping the epoxy, hardener and dye containers from being cross-contaminated and permanently wrecked was difficult.  Each piece of cloth soaked up the epoxy well (called "wetting" in the trade, I think), but needed help with little wrinkles.  The glass fiber strands from the edge of the cloth kept getting into my brush, onto my hands, and onto the piece, but it was manageable.


As you can see, by this point I've taken the glass off the edge of the level, because it wouldn't stand up properly.  Each time I ran out of blue glop, I changed gloves and mixed up a new 8oz batch.  By the time I had 13 sheets or so, I'd reached an inch thick and called it quits.
 
I already had the heat box set up in the driveway.  I'd cut some hardboard to spread the load of the small (3 and 5 pound) dumbbell weights I planned to use in lieu of clamps; all of it was outside waiting for me.  The plan:
  1. Put the stack, already on the plate glass, onto the edge of the level
  2. Run it outside and set one end in the opening of the heat box
  3. Slide it into the heatbox, adding one weight at a time, the level on edge keeping the bottom layer perfectly, utterly flat for attaching a fingerboard!
What happened:
  1. The sloshy, goopy stack of blue glop, satiny cloth and sheets of wood slid off the level and the glass when I added weight to it
  2. My driveway is not very flat, so the bottom of the heat box wasn't flat
  3. No matter what I did, the wood/glop/cloth slab would not stay rectilinear under weight
Oh my.  I had to keep the sheets vertical, and I was getting a little stressed out - each time the stack slid wide, I imagined all my epoxy smearing out and air getting in there.  After several attempts, and completely abandoning the narrow edge of the level for the broad side, I decided to use clamps to hold the sheets in line.  I put it in the heat box and the lamp would of course not go on.  Finally, it got that sorted - an outlet that was switched with the basement light!  Of course.

During the long wait, I finished off Possession by A.S. Byatt in ten minute chunks while I bopped the curing temperature between 160 and 180F.  At the end of nearly 3 hours, I'd had enough and called it quits.  I had no idea what to expect when i opened the box; I'd fixed the sheets sideways - but had they all slid off each other lengthwise?


That's my super-excellent emergency clamping job, visible after the mess came out of the oven.  There's the glass on top, and obviously somehow some space developed between the glass and the bottom wood sheet, because the ripples in the plastic sheet between the two are clearly visible.

In another interesting development, the clamps seemed thoroughly epoxied to my guitar neck.  I was concerned with hitting them too hard with a hammer, lest the cast parts smash the glass, but I had no choice.  There was glass fiber frizzing off it, so I took it outside with a framing hammer and bonked the orange parts of the clamp toward the ends of the board and they did come loose, but left their paint in the matrix.


That is one gnarly board.  I don't even feel like measuring it today.  The pretty, wispy fiberglass fibers are still there, lunging straight for my lungs, but they are now accompanied by some brittle, nasty glass fibers that seem to want to embed themselves in my skin and travel through my bloodstream to my brain.  Seriously, I don't like this board at all.  Part of me wishes I had not made it, it's so ornery.

What I learned:

  1. Composites are sticky and messy
  2. Composites are also hard-edged and brutal
  3. I might never know if I put too much weight on the piece and drove out too much of the epoxy from the cloth
  4. Build a clamping jig because even very flat, comparatively wide sheets want to slide off each other
  5. Consider not paying so much attention to making the piece "perfectly" flat, because at my skill level it's not likely to happen
Next step:  Trimming the board with someone else's table saw.  The air will be filled with sparkling death!


2010-04-03

Preparation for gluing a board to my head and having to to go the hospital

This is part right before the rubber hits the road; it hits the fan; go time.  If I don't prepare properly and have all my actions rehearsed, I will time out on the "pot life" of the epoxy and epic fail.  The pot life is listed by the manufacturer as 20-25 minutes at 80F, but my work area is in a basement at 62F which should give me some extra time.


I first cut the fiberglass fabric into strips bigger than my basswood sheets.  The cloth is 38" wide compared to my 36" long sheets, so that's convenient.  Above I've placed a basswood sheet on the cloth for reference, scored that faint line to the right of the sheet with the utility knife, and am about to cut along that line with those heavy duty shop shears.  The cutting goes fairly easily.


Now I've got 14 sheets of 8.9oz fiberglass cloth in a stack, nearly ready to pull from.  My hands will be gloved and glopped with epoxy so I will stack them in such a way that each piece hangs off the edge of the last by about an inch.  This stuff does not have a lot of diagonal dimensional stability, so I'm not at all sure I've cut along the exact line of the weave in each case.  Don't care, I think.

Tomorrow.  Powerful glue.  Me.  Adventures.  A race against the clock.  I've decided to just go and do the thing, no practice layup.

Bright light! Bright light!

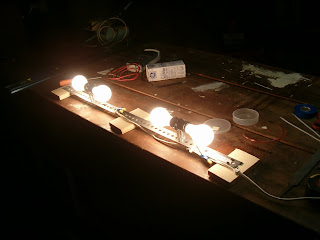
Time for a dry run of the heat box in preparation for the layup and curedown (that's a word I just made up to sound cool).  I finished wiring the lamp assembly and tested it briefly:


This is four 75-watt incandescent bulbs.  Saving energy here is exactly not the point.  I made sure that the wide blade on the two-prong plug, which is neutral and identified on the extension cord wire by rough striations, is connected to the white wire of the double receptacles.  This means the collar of the receptacles is neutral and the button at the bottom is hot.  That's what you do; I read it on the internet.  It's because the black/hot/narrow blade needs to be where you're least likely to run afoul of it, like when changing a light bulb while the lamp is still on.

I brought the heat box out into the driveway and ran an extension cord there as well.  The chair that is holding up the door is for sitting in while I wait for nothing to happen:


The lamp assembly is just visible on the left side of the floor of the heat box.  I fashioned the door, as planned, from two pieces of bad hardboard laminated together with spray adhesive.  To that I attached two of the three aluminized bubble wrap insulation sheets by going around the perimeter with the heavy aluminum reflective tape.  The third sheet I attached using the reflective tape as double-stick, folded in half the long way.  This makes the third sheet a gasket that is puffy right to the edge; the first two sheets are mashed down by their connection to the hardboard.  The hinge is more aluminum tape.  It doesn't have to be good for a lot of cycles.


On this 73F sunny day the heat box went from ambient at 11:25AM to 180F at 11:42AM.  The picture shows it a little lower because I'd unplugged the lamps 20 seconds prior, and I had not taped the door shut all the way around to make a tight seal (light was showing where the cord went in).  This setup appears to have very little heat retention ability, but I am very happy with the result.  There was no sign of overheating of the materials, the outside of the box felt comfortable to the touch, the wiring is solid, and I easily hit the target temperature of 160F.

Good day so far, I think.  Next, I'm either going to:
  • do a practice lamination and cure of a small basswood and fiberglass sandwich, or
  • just dive right in, go nuts, and see what happens
 I haven't decided which yet.